How to Upload, Refund, and Cancel Offline Orders
TSYS Smart POS Pro is a cloud-based system that requires an active Internet connection to operate optimally. However, if your Internet connection is interrupted, TSYS Smart POS Pro allows you to continue completing Orders while your register is offline by storing the Orders locally. These Orders are referred to as Offline Orders. Once you have completed an Order offline, the Completed Tab will have a red background to indicate there is an Order in the Queue. When your Internet connection is re-established, a pop-up alert will notify you that connectivity has been restored and ask whether you would like to go online. To exit Offline Mode, press Yes. To remain in Offline Mode press Not Now.
Note
To ensure proper operation of TSYS Smart POS Pro, you should return Online as quickly as possible. Remaining in Offline Mode is not recommended.
Upload All Offline Orders
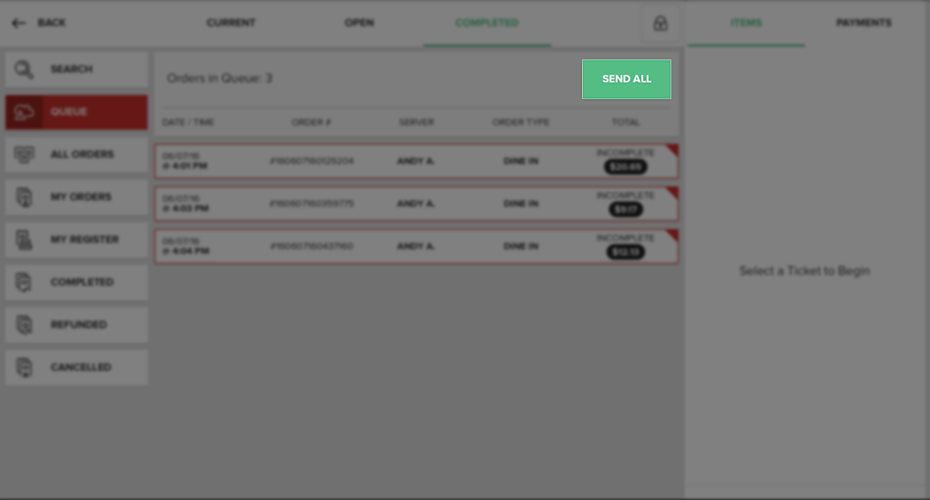
Once you have returned online, tap on the Completed Tab on the Orders Screen. You will be taken directly to the Queue Screen. Any Offline Orders will be listed in the center of the screen. To upload all of the Orders, press on the Send All Button. TSYS Smart POS Pro will display a pop-up that shows you the upload process for each Offline Order. Once all Offline Orders have been uploaded, the status for each Order in the pop-up will change to Completed and a new Online Transaction Number will be displayed. You will now be able to find the record for each Order you uploaded in the Completed Screen of the Completed Orders Tab.

Once you have completed reviewing the information presented in the pop-up, press Done to dismiss it.
Upload Individual Orders
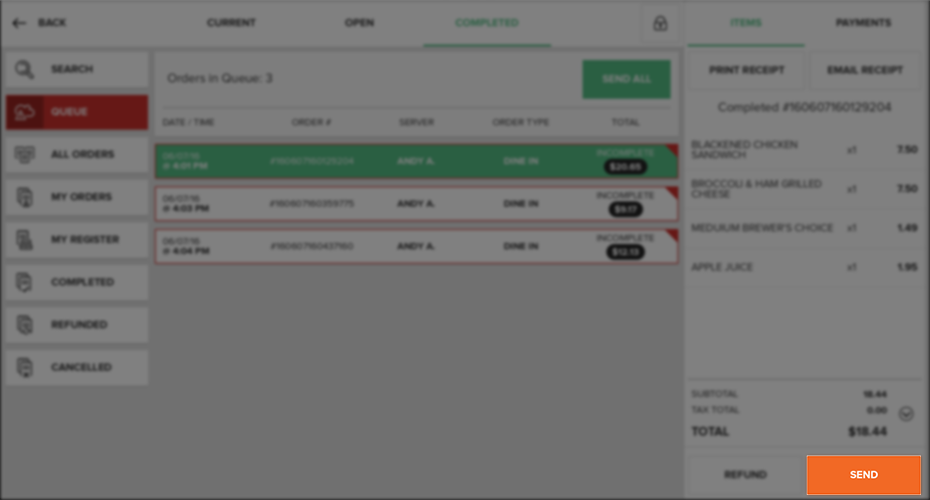
You can upload Orders individually by pressing on a specific Order in the center of the Queue Screen. The information for the Order will populate the Receipt Viewer on the right side of the screen. Press the Send Button at the bottom of the Receipt Viewer. Once the Order has finished uploading, a message will appear at the bottom of the screen notifying you that the Order was uploaded successfully. You will be able to find the uploaded Order in the Completed Screen of the Completed Orders Tab.

Refund Offline Orders
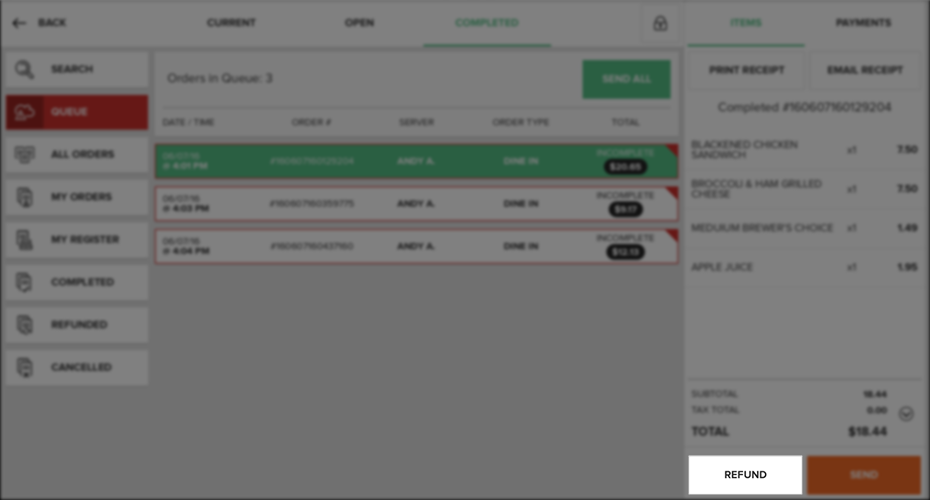
To Refund an Offline Order, navigate to the Queue Screen of the Completed Orders Tab. Locate the Order you wish to refund in the center of the screen and select it. The information for this Order will populate in the Receipt Viewer on the right side of the screen. Press the Refund Button at the bottom of the Receipt Viewer. A pop-up will appear asking you to confirm the refund. If you are sure you want to refund the Order, press Yes. Once you upload your Offline Orders, the refunded Orders can be found in the Refunded Screen of the Completed Orders Tab.

Cancel a Pending Offline Order
To cancel a Pending Offline Order, navigate to the Queue Screen in the Completed Orders Tab. Locate the Order you wish to cancel in the center of the Queue Screen and select it. The information for this Order will populate in the Receipt Viewer on the right side of the screen. Press the Cancel Button at the bottom of the Receipt Viewer. A pop-up will appear asking you to confirm you wish to cancel the Order. If you are sure you want to cancel the Order, press Yes. The status of the Order will change from Incomplete to Canceled. Once you upload all Offline Orders, the record of the canceled Orders can be found in the Cancelled Screen of the Completed Orders Tab.
Fail an Offline Order
In rare circumstances, you may have an Order appear in the Queue because of communication errors with the server. In this case, you may want to fail the Order to remove it from the Queue.
To fail an Offline Order, navigate to the Queue Screen of the Completed Orders Tab. Locate the Order you wish to fail in the center of the Queue Screen and select it. The information for this Order will populate in the Receipt Viewer on the right side of the screen. Press the Fail Button at the bottom of the Receipt Viewer. A pop-up will appear asking you to confirm you wish to fail the Order. If you are sure you want to fail the Order, press Yes. The status of the Order will change from Incomplete to Failed. Once the app uploads the Offline Orders to the server, the record of the failed Order can be found in the Transactions section of the Merchant Portal.
Quick Summary
- After your Internet connection is re-established, press on the Orders Button on the Home Screen.
- When prompted, press Yes to return Online.
- Navigate to the Completed Orders Tab. You will automatically be taken to the Queue Screen.
- Press the Retry All Button to upload all Orders.
- After reviewing the uploaded Orders, press Done to complete the process and dismiss the pop-up.
- Alternatively, upload Orders individually by selecting a specific Order from the center of the Queue Screen and pressing the Send Button at the bottom of the Receipt Viewer.
- To Refund an Order, select the specific Order from the center of the Queue Screen and press the Refund Button at the bottom of the Receipt Viewer. Press Yes in the pop-up to confirm the refund.
- To Cancel an Order, select the specific Order from the center of the Queue Screen and press the Cancel Button at the bottom of the Receipt Viewer. Press Yes in the pop-up to confirm the cancellation.
- To Fail an Order, select the specific Order from the center of the Queue Screen and press the Fail Button at the bottom of the Receipt Viewer. Press Yes in the pop-up to confirm you wish to fail the Order.
- To confirm that your Orders were uploaded, verify that the Queue Pane is empty, and find the Orders in the Completed, Refunded, or Cancelled Screens of the Completed Orders Tab. Failed Orders can be found in the Merchant Portal.